Documentation
Welcome to the Awesome theme!Once you have installed the theme to your site, you can edit all of the theme settings from your Shopify admin, in the Themes > Theme Settings page.
Logo, background and colors.
Logo
You can upload your own logo. It will look best on a white background. Try to make it smaller than 800 pixels wide and 120 pixels tall, but if you have a tall or a square logo you can make it bigger than that if you like. If you don't have a logo, its okay, your shops name will be shown at the top of the page.
Feature colors
Feature Color and Feature Color Tint are the colors of links and buttons within your site. The default colors (#6699CC and #003C82) have been chosen to match the Facebook and twitter widgets and like buttons, so we recommend you leave these colors at their default values.
Background Color
Background Color is the outer color surrounding your site. Have some fun with this color, it's away from your text and photos so you can make it vibrant and exciting. This color changes the gradient and patterned background styles too.
Background Style
Choose a background style for your site. You an have a simple gradient, flat color, a nice tiled pattern or upload your own custom background image.
Here are samples of the pattern's you can choose from:
Click on these color swatches to try out some different colored backgrounds.
Thankyou to www.dinpattern.com for the great patterns. There are lots more great patterns on his site that you can use by uploading them as a Custom background Image.
Products per page.
Select how many columns of products you want to show on the home page, product collections, search results and other pages. You can choose 2, 3 or 4 columns. Four columns uses 160 by 160 pixel images. Two or three columns uses 240 by 240 pixel images, so with 3 columns the images may get cropped slightly depending on the proportion of the image.
You can also choose how many products to show per page; 12, 24, 36 or 48. If you show fewer products, your pages will load faster, but showing lots of products on a single page is more user friendly.
Fonts
We highly recommend you use the default fonts (Oswald and Droid Sans), but if you want to you can change the heading and regular fonts here. Click here to see what the various fonts look like.
Magnify widget
When you enable the Magnify widget the photos on your product pages will have a zoomy magnifying glass circle when you roll over them. It'll work best if you upload product photos that are square, and at least 1024 pixels wide and tall.
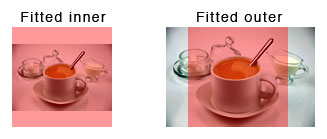
"Fitted inner" and "Fitted outer" change how the pictures fit into the square Magnify widget area. Fitted outer looks best, but the edges of your pictures get cut off slightly.
Front page slide show
Upload up to 5 images to play in a slide show on the front page. If you disabled all of the pictures the slideshow won't appear and the products will all move up the page. The pictures need to be 950 pixels wide and 320 pixels tall. You can have a caption and a link for each picture.
Facebook buttons and widgets appear in several places in this theme. Here you can choose to turn each feature on or off.
The front page Facebook widget shows a summary of your Facebook account. For this to work you need to enter the URL for your Facebook page. For example: "http://www.facebook.com/minecraft". You can see the Facebook documentation for this widget here. If the front page of your site takes too long to load, you might want to try turning this widget off.
If you enter your Facebook ID and are signed into Facebook, you can administer the comments on your Product and Blog pages where the comments are displayed.
A Facebook like button shows at the top left of every page, in the top navigation area. When a customer clicks that like button they are liking the homepage of your site, no matter which page they're on. This is so that you get a larger number of likes.
On your Product and Blog pages a like button shows under the main body text. These like buttons link to the specific page they are on.
You can enable Facebook comments on your products and on your blog pages. If you enable Facebook comments on your Blog, Shopify's comment form and comments are hidden.
The Twitter Tweet buttons show in the top navigation, product pages and blog pages. You can choose to enable or disable them just like the Facebook like buttons.
The Twitter front page widget shows recent activity on your Twitter account. You need to have entered Your Twitter name for this to work. If the front page of your site takes too long to load, you might want to try turning this widget off.
Contact us form
Choose a page to put the Contact Us form on, maybe your About Us page or add a new page called Contact us. When customers fill in and submit the form, the information is emailed to you at the address you use to sign into Shopify with.
Text you can translate
Here you can modify the text used in this theme. This is useful if your site needs to be in a different language or if you want to add some color and characta' to yo' sites text. Man!
You can modify the text used by Shopify on the checkout pages by going to the Shopify admin > Preferences > General settings > Checkout Language drop down selector. There's an option there to create a custom language just for your site too.
Side Bar
In the left side bar you can add extra navigation levels. In the Shopify admin, go to the Navigation page and click the "Add link list" button near the top of that page. The title of the link list becomes the title of the sidebar navigation, and each item in the link list can link to anywhere in your site or external sites.
For example, if you are selling clothes, you could create a link list like this:
- Mens Casuals
-
- Tees
- Tanks
- Hoodies
- Socks
- Accessories
- All
And have each of the items in the link list go to a Product Collection page.
You can have up to 20 (yes 20!) of these side bar navigation link lists. We can't give you unlimited link lists, but if you do need more, let us know and we'll sort it out for you.
Cart
You can choose to have an additional notes field on your Cart page.
Payment Logos
These logos appear at the bottom of every page, choose which ones you want to display.
Currencies
This allows your customers to view prices in their own currency.
Shopify and this theme support multiple currencies, but only on the front end of your shop. All the transactions and behind the scenes processing is done in your shop's currency. You can change your shops currency in the Shopify admin > Preferences > General Settings > Money drop down selector.
For example, if your shops currency is USD and your customer is in Australia, they can select Australian Dollars (AUD), and view products and their cart in Australian Dollars. When they checkout they are charged in USD and its up to the payment gateway and the customers bank to figure out the exact exchange rate at the time of the transaction.
There is a note a the bottom of the cart screen that explains this to the customers:
"ShopName process all orders in USD. While the content of your cart is currently displayed in AUD, you will checkout using USD at the most current exchange rate."
You can edit that text in the Text you can translate section described above.
In the Shopify admin > Themes > Theme Settings page > Currencies section… you can tick the boxes to choose which currencies your customers are shown. It's best to show fewer than 10 currencies so that the selection menu doesn't get too long and make it difficult for customers to find their own currency.
If the currency you want isn't listed, let us know and we'll sort it out for you. There too many possible currencies (over 170!) to display them all in the Shopify Theme Settings.
And a big thankyou to Caroline for her great tutorial on multiple currencies, you can read it here if you want to add currencies to your own theme:
http://wiki.shopify.com/How_to_Show_Multiple_Currencies
Additional Layouts
After your customers checkout and have completed their purchase, you can offer them the option of registering and creating an account. The options for this are in Shopify admin > Preferences > Checkout & Payment > Customer Checkout settings.
If you have customer sign in turned on, you can choose in the Additional Layouts section if you want to use the Shopify default layouts or this themes layouts for the customer area.